Wednesday, May 19, 2010

Statement

After 3 months i have to stop my blog. After nearly 5 Years of working on track creations, i have to quit because of serious health problems. That's one reason why i've created this blog. I've just wanted to help beginners with some tutorials or tips and start my personal archive of onboard laps of all the tracks ive made during the last couple of years. Since i've posted the San Jose onboard lap i received nearly 20 email with accusations and a lot of threats.
I have to say the plan was to release the tracks with 2d help from 6e66o. I was abused as a robber who used textures of other authors. Yes it's true, but i never released or sold tracks with content of other people, and as i said the plan was to release the tracks with the help from 6e66o. He should replace the textures i used from SLN or VirtuaLM for example. Also i was accused of used 3d work of IDT's first San Jose Track. All i can say watch here:


I made this track in 2007 so my quality is way better today, but you can see its 100% different + I never had IDTs San jose. A friend send me a link from f1 classics forum a few days ago, thats why i show you those screens incl. 1 wireframe screen.
Also my Yas Marina beta track which was made for a commercial project and provided exclusive for the final round in VRRC League, was leaked with no respect! I've decided to stop my blog (But you can still read the recent content) because i don't believe it's worth it! I still get emails with attacks....so, byebye community!

Thanks to all who like my work and supported me!

Wednesday, May 5, 2010

VertexPaint

This time i will show you again a very helpful tool. You will find it in the "Modifier List". It's called Vertex Paint. With this tool you can paint on a mesh. Click on "Vertex Color Display - Shaded" and then on paint:
You can also choose size, opacity and color


I use it mostly on Grandstands with a roof. So i will paint the part of the grandstand under the roof dark inclusive the people who sitting there.
You can use it everywhere. On the pic you can see that i used it on the grandstand, peoples, seats and the little "building" on the left.
You may have to cut in some new edges because the color adapts to the edges.
Just test it!

If you have any questions or wishes, please mail me (moe16@hotmail.de) or comment here!

Wednesday, April 28, 2010

*.gmt import

Many people asking if it's possible to import *.gmt into 3dsmax. It is possible and i will show you how:

First you have to download the gmt import plugin by zoli

http://rapidshare.com/files/381058001/importGMT2_by_zoli.rar.html

I remember it was available in the old RSC forum but since it's past i hope zoli have no problem for my upload of his great plugin.
The *.rar contains a readme how to install the plugin.
As soon as it's installed you can use the plugin in max:

My tip is to create a folder with the *.gmt's(and the textures they need) you want to edit in max. It needs sometimes hours to import a whole track!
Another important thing is the size of the import meshes. Go to "Customize"->"Units Setup" and click on "System Unit Setup" and use meters instead of inches. Otherwise the import will be very small!
The most materials without shaders are called after an import (Cube map bla bla bla). Just select a simple t1 shader and you can use this material again. Sometimes some normals are weired or destroyed on the mesh, but basically it's a great tool. It's highly recommended!

Hope it helps

If you have any questions or wishes, please mail me (moe16@hotmail.de) or comment here!

Monday, April 19, 2010

General Track Building Tutorial/Tipz 2

I've decided to show you in a video how to use boolean and extrude and what they do:


With boolean you can cut an object into another object. So you can easily create 3d windows or whatever you want. Extrude is also very helpful (especially on car editing) as you can see in this video i made the roof with extruce tool!

If you have any questions or whises, please mail me (moe16@hotmail.de) or comment here!

Monday, April 12, 2010

General Track Building Tutorial/Tipz

I've received 2 emails from people who want to know some steps for beginners. That's why i start now with some video "tutorials". I hope it helps somebody if they see how it goes in 3ds Max.


This track is just fantasy. First step is to create a simple line of the track layout. As you can see in the video i do it fast and not very clean. That's why you have to use "Bezier". With this great tool you can smooth the track very well.


Most rF tracks use ugly 2d fences (the poles on the textures). Do the poles 3d! You don't have to do it manually, just create a line and with the spacing tool, the pole will follow the line how you want it.
Note: You can also loft from this line the fence.

If you have any questions or whises, please mail me (moe16@hotmail.de) or comment here!

Monday, April 5, 2010

Map channels for better roads

In this tutorial you will learn how to work with map channel!

You see something like that:


on many tracks! You can see several materials for different road textures (in this pictures 3). The shaders (road_s or something like that) are totally destroyed and it looks ugly. Road (and gras) shaders should be very uniform.

Let's start with a look in the material editor:
You will find this section below the gmotor texture (where you load textures, set mip bias etc.) section.
Only use map channels with shaders like add or mul. As i mentioned in my "Good Quality - Good performance" tips, i only use specular map t1 on roads. So let's do map channel on specular shader! Set the map channel on 2 and scale the texture with the "Tiling" settings till it looks good. If you have another shader (like on bump specular map t1) set this map channel on 3!

Set the same tiling entries on every road material shader you have, then it will be very uniform.
Next step: Modifier List ->UVW Mapping. Don't worry, it will not destroy the whole mapping of the track, just set map channel on 2 (if you have more you have to do this again with 3).
Collapse and export and you will have a result like this:

2 textures on 2 materials with an very uniform shader texture!

Note: Usually i use it only on road and gras. If you have more objects (track01,02 etc.) you have to select them all and then to the step with uvw mapping and export them.

It's very hard to explain but i hope this tutorial will help you. If you have any questions about this tutorial mail me (moe16@hotmail.de) or ask in the comments!

Monday, March 29, 2010

Good Quality - Good Performance

Not a tutorial but some tips to get the best quality with best performance.

1. Shader
Usually i never use bump mapping. Sometimes on buildings but thats very specific.
In my opinion it looks very unreal on road. Best road shader is "Specular Map T1". You can use "T1 add t2 "too, but if you work with transparent edges from road to grass with the same shaders as road, you can't use "t1 add t2" because this shader does not support transparent settings (scr alpha + inv scr alpha).
My grass shaders are always "t1 mul t2". Some tracks have specular shaders on gras but it kills the performance and looks not very real in my opinion!

2. High Quality meshes/textures
Try to keep the number of polies under 1000 by gmt, then it doesn't mather how high poly your track is. Of course you have to operate smart with the lodout setting in the export area.
For the textures: For sure you can use big textures with 2048 size but try to have as less as possible big textures.
Many tracks have 1000textures but a lot of them are useless. Try to do a texture which you can use for more objects, like buildings or poles for example.

3.LOD out
This setting is one of the most important. Try to use this setting on every object you have (especialy the high quality objects). With "tools->measure distance" tool in max, you can measure the distance from the place where the object should pop up, to the object. I hate tracks where you almost see everything is popping up. Try to let them popping up in an area you cannot see it from your carview. The LOD out settings are very important for high quality objects or transparent objects like trees.

Note: It's very difficult on kart tracks because the most time you see everything of the track. But the most kart tracks are small so there are not so much textures/polygons like on a f1 track for example.

4. Shadows
Never let a high quality object cast shadow. Use a copy of the object and do a smart LODout distance and use for this copy in the *.scn file "Shadowobject" and not "Render=False". This will save a lot of fps.
Correct:
Instance=building01_shadow
{
MeshFile=building01_shadow.gmt CollTarget=False HATTarget=False ShadowObject=(Dynamic, Solid, 512, 512)

Wrong:
Instance=building01_shadow
{
Render=False
MeshFile=building01_shadow.gmt CollTarget=False HATTarget=False Shadowcaster=(Dynamic, Solid, 512, 512)
}

Use dynamic only on bridges or on some buildings. I see on many tracks that all shadow instances have dynamic, especially cones, thats useless and fps killing!

5. Materials
Try to keep the number of materials by "ball" under 100 in the material editor. Usually i have 4 Balls:
Main track (road, gras, walls....)
Buildings (Pitbuilding, skyscraper....)
objects (cones, signs, tirewalls....)
nature (trees, palms, 3dgrass....)

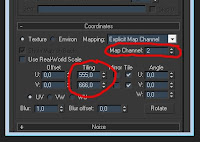
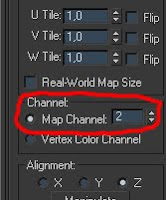
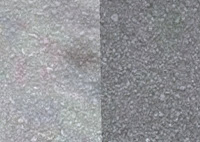
Sometimes mip maps bias killes fps too. At the most objects you have to use "-1" thats the standart. At road (especially for the white lines) you have to use -3 or -4. I see many tracks which have bad mip maps and the objects and roads looks very blurry.
If you use chroma color you have to set a very high negative mip map like -5 or -6, thats why transparent (scr alpha + inv scr alpha) is a better solution (usually i use -2 mip maps). But as you could read on my trees tutorial it's sometimes a bit difficult because of the "seeing other transparent objects trough" bug.


Those points are the most important fps optimizing tips you hopefully can use on your tracks. If you have questions mail me (moe16@hotmail.de) or give a comment :)

manolo